Thursday, March 28, 2013

Paint and progress


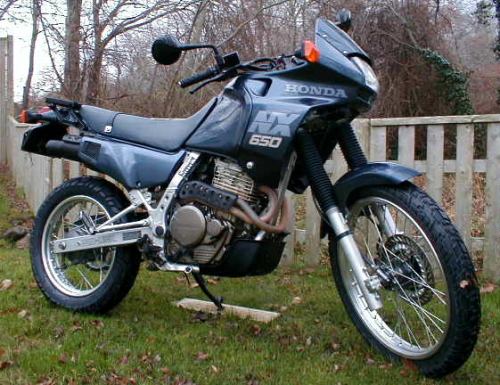
The sun is starting to come out and the bikes are going by my house. It has been a short winter and I have lots of work left to do.


I am, however, making progress. I have my headlight bucket and fender rails powder coated gloss black and I  have my tank primed and sanded and read for the first coats of paint. Today I got the first coats of paint -- real paint -- on the highlight areas of the headlight bezel, the air cleaner and a few other trim pieces. It took a while to get the right red -- I wanted something dark, but that would still jump out. What I ended up with is Regal Red from Rustoleum - which is actually pretty close to the stock red. So far it looks good and glossy and I'm pretty excited about what the final product is going to look like.

I haven't settled on the paint job for my tank and fenders. That's why I'm focusing on trim pieces where I have a better idea. This is either going to be a red bike with black trim or a black bike with red trim.


AIS is gone. New pegs is on!
Meanwhile, I've been cleaning up the front of the bike. I took the AIS system off - a common mod -- and then noticed the California emisssions can on the other side. Turns out, I don't have an California tank, so I took that off too. Now the front of my bike has a cleaner, more open look without all the nanny-state plastics. That said, I could not get the AIS plugs out of the engine, so I sealed them off. The back plug elbow  broke off while I was trying to use the slide hammer to yank it out. So I sealed that up with some steel reinforced epoxy. The front one is sealed with a little bolt. I'll paint them black -- maybe put a little copper plumping cap on -- give it that steam engine look.


The two hoses left behind by the removal of the AIS and the Cali Can are plugged with a golf tee and a rollover valve respectively, but I might remove the rollover valve and extend the hose.

I also put on the new front pegs, which are much better than the bent ones that were on there previously. I took the exhaust off and discovered a lot of rust and dents. I bought all new gaskets and I'm giving it a nice coat of ultra hi-temp Rustoleum gloss black. My goal is to get it looking like an old un-restored bike - no chrome, just a tough old donkey ready to go anywhere.

I still have a lot to do. Even if the paint progress is encouraging, there are still a lot of projects left before I get on and ride. I have a braided brake line and new brake pads for the front. I need to take the rear wheel off and lube the splines of the main drive shaft. While I have the wheels off, I want to paint -- or plastidip -- them.


Ready to paint - I'm using a total of three
different kinds of primer on this project. 


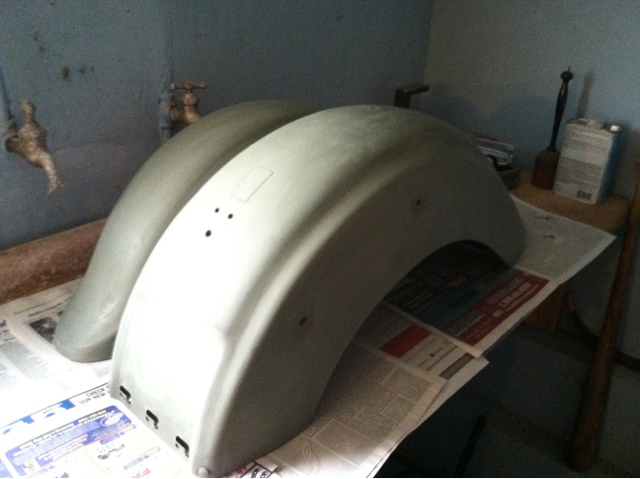
Fenders are almost ready for paint.
Another coat of primer and some sanding first. 
Good bye rusty pipes. 


This is my blank canvas. 

Thursday, March 14, 2013

Tank Boy

Okay, I got El Burro cheap. It had a dented tank, bent foot pegs and rust. This winter is my chance to correct all those problems, and do a little custom work as well. I've been working on it, but I really need to get down and dirty over the next few weeks if I want to have it on the road for Spring. Already on a sunny day, I can hear the bikes going by on the highway as I wrench away in the garage.

Before - Rust and Dentitude. 
Repairing the tank is probably the one thing that will get the most attention in the long run and will make me happiest when I look at El Burro across a parking lot and say "that's my bike." It's also something I have tackled before.

First step was the get it off the bike and get the old paint off. For this I used my old stand by Citristrip. It's non-toxic. Smells like oranges and cuts through layers of paint.

The first coat's results were not impressive -- I was just eating through the clear coat. Once I scraped that off and put on the second coat, things started to get interesting.

Citristrip after.
The whole side peeled up to be stripped away. WD-40 will take off stickers, but I didn't bother -- I just let the Citristrip do the work for me. I brushed it on and walked away for a few hours. This is what I found when I came down stairs. Easy-peasy to scrape off with a plastic scraping tool. We used a grocery bag over one hand like a glove and the scraper in the other, the stuff is a little sticky and like's to stay on the scraper so we pull it off with the bag/glove. Works great. We (and by this I mean mostly Amy) have done all the trim in our house this way.

You don't really scrape this stuff off. It is more like the effort you'd use to lift a pancake off a greased griddle. Not a lot of sore elbows, which I like.

After the paint is all down to bare metal, It's time for repair. Bondo is my dent remover of choice here. If you've never used it, there are tons of tutorials on YouTube to school you.

My impression is that it is easy to do, hard to to right. My last tank was adequate, but I could still see the imperfections. This one I took my time on and I hope I'm getting better. I've noticed that it is easier to go by feel than look. Took me multiple tries to get all these dents filled, and the more I worked on it, the pickier I got. That's probably a good sign.

I am learning patience ... slowly but surely. I just wish I'd learn it a little faster.

Once the Bondo work was done -- and all the sanding that went with it -- it is now time for paint. I start with a filler-primer that is supposed to fill in the imperfections.

First thing I notice is that while my main dent looks pretty darn good, the small dents need a little more sanding to be perfect.

Oh well, back to work. While I'm working, check out this guy's rattle can paint skills.


Monday, December 17, 2012

Mud Time

It's winter and I have the binnacle off the VSTAR as the first part of the tear down. Should have pictures as I go. I'm excited to start tearing off paint and getting that dent sorted.

Meanwhile, I also need to get Lindsay's old CT70 running. It's just about all complete but the wiring needs work and I think I need to clean carbs and the fuel line after years of abuse.

Once it is up and running, I'll be looking for a dirt bike of my own. I don't have one and I don't plan to start brand new. I'm not jumping or racing, but I would like something to play in the mud with and to go up logging roads exploring.

Reading the ADV sites, a couple of bikes have my interest even though I'm not a dirt bike guy. Here's the buck list -- or my Craigslist Wish List:

TW200 : Yamaha is still making these -- and have been since I was in high school -- virtually unchanged. They are trail thumpers that are easy to ride, impossible to kill and reportedly very fun to have around. I'm tempted to sell El Burro for a pair of these and get Amy riding with me.


The XL Hondas look just modern enough without looking like a pointy-plastic Asian appliance. The XL600 R would be a great Dual sport, especially if I could find one to restore in the Red-White-Blue of the Paris-Dakar trim. The Red Engines Made 'Em Better. According to the forum on ADVRider, they will keep up with modern 650s for the most part and are actually lighter than the Hondas that came after. I think they'd be a blast on the logging roads or out in the fields. 


NX 250 - 650
These days Dominators are getting chopped up into streetfighters all over the world. Yet, I love their fairing up front and trail bike stance. I think it would be great to have one of these. In fact I almost went south into Oregon to buy an NX250 the week I bought El Burro. 
From ADV rider
Honda Transalp in the form of my teenage dreams.

Rare. Beautiful. This was the motorcycle in the Honda shop when I was a teenager that called my name but I could never take home. They only imported them to the US for a few years, but sold them like hotcakes around the world. Would love to get my hands on one for long range adventure touring. 


Sunday, September 16, 2012

Let there be lights!

I needed a bit more light on the front end this time of year as the sun starts setting later in the day. I picked up some yellow fog light from Bulletwala.com and some frame clamps. I wired straight into the blue wire so the are always on. The lollipops only come on when turning.

Monday, July 23, 2012

New Paint Ideas of El Burro

"I like it red," Amy says and I let that be the last word on a debate going on in my mind.
The inspiration for El Burro?

With the rust and the dents in the tank, the Burro is going to need a paint job, and that's the fun of buying an old bike -- making it my own.  For a few hundred more, I could have had a garage queen, but chose the donkey that had been ridden 25,000 miles instead.

My V-star 650 classic will need a paint job, and like my last build, I want to do it myself. So what color?   Blue or Red Motorcycle? A question as old as time. 


It is red over purple now. I thought a dark matte blue would be cool and even painted the side covers that color, but I also return to my first impressions. When I was driving bike home in the back of the truck I saw it as a crimson and gray tribute to my alma matter - Washington State University. 

I don't want to do a traditional chromed out custom, or a matte black monster. Custom means you take other people's ideas and let the source material speak to you, tell you what it wants to be. My crimson and gray paint scheme will take it's cue form the current Cougar uniforms which are bad ass.  I especially like the gloss gray over matte gray of the alternate helmets - would like to incorporate that somehow.  I even found a website that has the hex numbers for the branded colors, so I can get a pretty good match.

So, now that I've decided on Crimson and Gray - what style? Well, here are some inspirations. This is the bike The New Blood from Deus Ex Machina. I love the matte red and pearl and think my bike would look great with the same style in Crimson and Gray. Deus did an earlier Harley custom with an all gray finish, which is my other main inspiration - Their 1200 V-Twin Cafe Racer.

I also like some of the designs from Shaw Speed - especially the Flatliner and other more retro builds.

Shaw uses bullet lights mounted under the mirrors and I like that look. It cleans up the front end and gets rid of the lollipops.

Brighter LED turn indicators should help make me more visible to a texting driver getting ready to make a turn. The Deus boys tend to hide their indicators, which is fine when you are not battling fog on a "summer" day like today. One the handle bars, they integrate better. Smaller but brighter is what is in my mind for both the front and the rear of the bike.  I can run the electrics from the signals down into the handlebars along with the other wires when I cover the loom. Should look pretty cool, but the test will be when I look at how much work it will be do get rid of the old indicators up front.

Moreover, I have a nice set of passing lamps I purchased from down under. Should I put them on - using the existing light bar, or should I keep the front end clean? Decisions - decisions. That's why I'm happy to let Amy make at least on key choice for me.

For want of a bolt.

It's a convoluted story, so here goes. I bought a fairing off Ebay. It didn't fit the classic, so I sold it to a buddy with a Vstar 650 custom. While I was looking at it, however, I decided to take off the fairing mounts left on by the previous owner. Three of the four mounting bolts came off without a hitch. The fourth bolt was stripped. I spent a day on one bolt. Finally broke the head off, then I started in with the EZ Out borrowed from my father in law. Broke the EZ Out.

So I just bought another tripple tree crown. When I get it, I realize I haven't put the new risers on yet .. and they won't come out of the old one. In fact, even with a "tap" from a hammer, they won't budge. Screw this - ebay - new risers.

By the time they come in the mail, I've missed the better part of a month of riding because of one damn little bolt. I put it all together and it works great ... except I have almost no front brake -- somewhere when the handlebar was off, I lost my brake fluid. (sigh)

These little frustrations slow me down, make me think about where I want to go with this bike, what I want it to look like. I am making it a point to replace every bolt with a new one as I go. Slowly but surely, I will leave this bike better than I found it.

Saturday, May 26, 2012

De-purple

Okay so I got some Rustoleum hammered paint and wanted to try it out. I also have these purple side panels on the vstar and I hate purple. I used WD40 and a blow dryer to remove the stickers then scuffed the plastic with some 400 grit. Two layers of the hammered look good but I will probably cover it with a darker color eventually when I do a full repaint. Hard to see in the pics but the hammered does make the plastic look like metal -- I'd call it more pitted than hammered -- but that might be due to temp and humidity where I was painting. I've got to make myself a paint booth before I do the whole rig.