Thursday, September 12, 2013

Summer fun on El Burro

It has been a while since my last post, mostly because I've been having fun riding rather than sitting at computer. In fact, I just got done riding around the valley with my wife. Good fun on a sunny fall day. The bike is running well. I've had a few little glitches, like when I realized that the battery needed replacing, or when I ran the reserve dry 200 yards from my driveway. I'm also planning more changes to the bike including removing the lower yellow lights from the front and investing in some new pipes. Meanwhile, I thought I'd update the site with some pictures of the finished product taken over the summer. Enjoy!


Saturday, June 1, 2013

El Burro Lives!

Runs great. Working this week, but I got a quick ride in. More next week. 

Wednesday, May 22, 2013

El Burro Reborn! Almost ....

This is getting exciting. Yesterday I got a lot of work done. Got the rear brake on and lubed the splines. Then I reassembled the whole back wheel. Wired up the rear fender and then --- holy Moses! It looks like a motorcycle. 

Actually, it looks more done than it is. Needs the gas tank sanded, plumbed and reattached, then I need to put the exhaust system back on and install the front brake ... Wow, it is looking good! 

I had to stop there and clean the garage - tearing down my temporary paint booth and using the plastic to protect the bike from a leaking roof. It has been raining cats and dogs out there and a slow drip had found the bike - luckily I had the cover on. Now the shop is a lot cleaner and the bike is nice and dry.

The front driving lights are all wired up. I've installed new grips with a boss crampbuster on the throttle. This is the third pair of grips I bought on line. The first two didn't fit. 

The wiring is wrapped with braided wire cover and looks tons better. I've also installed the battery with the quick charger wires tucked under the side cover so no more need to disconnect the battery to trickle charge. I just vented my gas cap -- a needed mod after removing my California emissions canister. 

What else have I done? Oh yeah, painted the engine with a high-temp black! Only snag so far is that my red brake light doesn't come on but I don't think that's a short. It might be something that's not connected. I'll have to dig further. 


Friday, May 17, 2013

You Can Do A Lot With the Stock Light Bar


Still need to wire them all up.
On the VSTAR 650 Classic, the stock lightbar is boring, but that boring can be dressed up with a couple of clamps and some aftermarket lights. (see my earlier post.) I bought a lightbar and lights off of ebay from China thinking that would be an improvement. Well, the result was that the bar mounting holes didn't fit - likely it was for a 650 Custom - since I've made that mistake before.

I had thoughts of drilling new holes in the lightbar, but instead decided to see what I could do with the stock bar. The result is kind of funky, but I like it. That describes a lot about this motorcycle. It ain't for everyone, it's for me. That's what customizing a bike is all about, right?


Sort of a Quadrafenia look.
 Essentially, I just clamped my old driving/fog lights below and added the China lights up top. Should give me a lot of visibility going down the road. Stock lollipop turn signals are still there.

Oh, and I shot the bar and light housing of all the lights with Appliance Expoxy. Shiny black is good.

Speaking of shiny black, here's a pic of the final drive and rear wheel. Just have to lube the spines and put the new brake shoes in, then I can put it all back together. Appliance Epoxy on the drive and VHT brake caliper paint on the rear drum. I don't know if the drum gets so hot that it needs the VHT - but it is also next to the pipes. Besides, I have all whole can that I bought just for the front caliper and why take a chance?


Monday, May 13, 2013

Final Countdown? Amost, but not yet.

No pictures, but a bit of an update. I've got the new back tire on and the rim all painted. Looks great, also painted the final drive and the drum. Still need to change out the shoes and lube the splines, but I'll be able to reassemble the whole back end once that is done. Meanwhile, I've got the handlebars off to give them a coat of paint. I've painted the driving lights with appliance black too and that's made them look very cool. Can't wait to put it all together in a week!

Thursday, May 2, 2013

Changing Tires, Making Progress While the Sun Mocks Me.

The closer you get, the more there is to do.  From the picture it may not look like I'm making progress, but I'm actually really doing great. Unfortunately it is sunny and 80 degrees this weekend and it would be perfect for a ride. (sigh) Oh well, inspiration to work harder.

As you can see the front fender is on. The wheel has a new tires on it and was masked and painted with Rustoleum Appliance Epoxy. Looks brilliant - almost like an old German bike lacquer finish. I took the brake caliper off and noticed a ton of brake dust coating it. I had already cleaned it once and so I suspect at leak either in the seals or in the brake line. So I'm replacing them both rather than expose the new paint to a potential brake fluid leak -- and my ass to brake failure. The line is brand new and braided, the caliper is off a 2010 VStar which means the seals will be 10 years younger than the mine.

Get the picture?

I also polished the front forks. Considered painting them all black, but they were so scuffed that I had to sand them down to get them smooth anyway, ended up liking the polished aluminum look and I'm going to leave them that way. Can always paint them next winter if I change my mind.
The tank is polishing up nice and there is no trace of the dent even when buffed and polished to a nice shine. Unfortunately, I did manage to put an all new scratch in another section of the tank. (DRAT!) Will repair that and put on more clear before the tank goes on, but it is nice to see how good it is going to look polished up. 

I bought a new lightbar off of eBay. Cheap, but not an exact fit. It will fit with a little drilling and should look good. Anyway, I'm getting excited and will be able to play around with all that stuff while I wait for my wheel paint to cure -- did I mention that this epoxy takes a week to cure? Yeah, that's the downside, but otherwise it looks great and is hella cheaper that powdercoat.

That back wheel if off and going to get the new tire on and balanced tomorrow. I also got new rear drum shoes because -- well, I have the back wheel off and I have no idea how old they are.  Why not start out with new brakes. Will change the fluid in the drive and lube the splines while I'm at it.

Do you see a dent? Nope. Looking good. 


Front wheel looks good. Like this Appliance Epoxy stuff.

One coat appliance epoxy. 


This is the look I'm going for. 


Monday, April 15, 2013

Fun with Spray Paint

Hammered paint with appliance epoxy over.
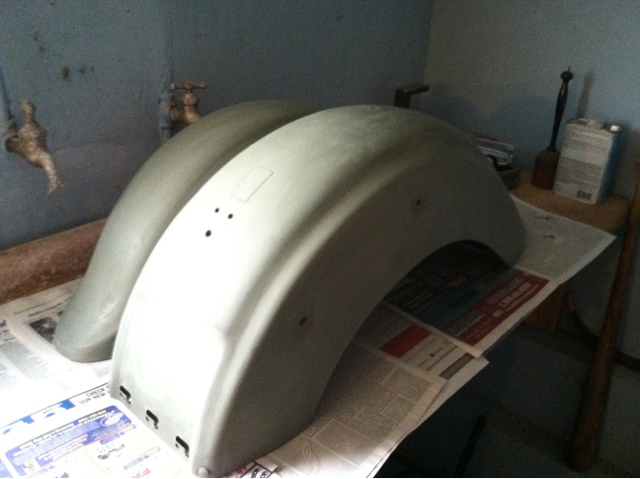
Doesn't look like plastic -- more like enameled cast iron. 
Cosmetically, I'm having fun with this project. The bike when purchased was red, purple and rusty chrome.

So I have set out to rectify the appearance of the bike by eliminating as much chrome as possible and getting rid of the purple. The great thing about the VSTAR 650 Classic is how much of the bike is steel rather than plastic.

Those big sculpted front and rear fenders are made of metal and so I can sand it down to the metal and start from scratch. That said, the bike does have some cheap plastic bits on it and I don't like plastic.

At one point I removed the decals and painted the side covers with Rustoleum Hammered metal to get rid of that too-smooth plastic look. It worked great, but now I want the side covers to be black. I could strip off the old paint, but again, I don't want it to look like plastic when I'm done.

So I tried painting over the hammered with Rustoleum Appliance Epoxy - a paint intended for painting refrigerators but used successfully by motorcycle folks to get that powdercoat look without the cost.  I used it on the smooth plastic speedometer binnacle and very very happy with it. I wasn't sure how it would look over the hammered paint finish. Turns out, it looks pretty good -- if enameled cast iron is what you like. Beats plastic. I'm also using the same combo of Hammered with Appliance Epoxy over to make the cheap looking plastic covering the neck frame look less horrible. It is not a look for everyone, but I like it.

You can also see I'm playing around with some graphic ideas for the El Burro - I like the type above, but I think I'll try to mimic the sweep of the side covers somehow. Early days yet.

Another part of the bike I wanted to change was the rear tail lights -- It is kind of a droopy mustache looking thing that broke when we were getting the bike out of the truck. I've repaired it but always kinda hated it - it was rusty and funky looking. Over time, however, I've started liking it. It is very distinctive of the V-Star model line, and I've found it a neat way to identify other Vstars the road or in pictures.

The rusty chrome had to go, however, so I sprayed it with Plasti-dip. It actually doesn't look that bad -- the plastic stuff hiding the imperfections and even the electrical tape holding the left side up.

Meanwhile, the rest of the paint is coming together. I really like the Regal Red as it the layers get thicker. The earliest parts have already had clea rcoat and I started sanding with 1000 grit and polishing with the Mequiars Ultimate last night. (as demonstrated by this guy)  It looks great -- amazing for rattle can spray paint. Can't wait to see the tank and fenders with this finish.


Monday, April 8, 2013

Red Paint Going On

Paint is going on. Red and black. Of course some parts are already powder coated black. I used ultra hi-temp paint on the ugly pipes to blacken them up. They look pretty good. I was going to wrap them with pipe wrap, but the stock pipe layout doesn't really lend itself to that. If I upgrade my pipes down the line, I'll probably wrap those -- I hate chrome.

Here's a hint of what we're going to be looking at in the future. Red and black on the headlight and air cleaner, black pipes, red tank. You can see that I did the Key Mod of the Webslinger's website (RIP). I also coated the plastic neck guards in Rustoleum Hammered black to give them texture. The chrome driving lights and signals are coming off and will be replaced with matching red and black theme.

The first layer of red went on the tank today. It looks awful bright in this picture and there is still a lot of work to do.

I also took off the California emission can and ran the overflow hose down empty space where the can was before. I have the AIS holes all plugged.

Before I put the exhaust back on, I should probably pull the back wheel off and lube spine on the drive shaft. If I do that, there's a couple other projects I could also tackle -- the rear brake, painting the spokes, etc. The front end is the same story - new brake pads, clean the caliper and disc, paint the wheel and replace the brake line and fluid. I'm getting tempted to just put it all back together for a quick spring ride.   Oh well, it's only April. If I stay focused, I can still get a lot done before the sun comes out in July.

Thursday, March 28, 2013

Paint and progress


The sun is starting to come out and the bikes are going by my house. It has been a short winter and I have lots of work left to do.


I am, however, making progress. I have my headlight bucket and fender rails powder coated gloss black and I  have my tank primed and sanded and read for the first coats of paint. Today I got the first coats of paint -- real paint -- on the highlight areas of the headlight bezel, the air cleaner and a few other trim pieces. It took a while to get the right red -- I wanted something dark, but that would still jump out. What I ended up with is Regal Red from Rustoleum - which is actually pretty close to the stock red. So far it looks good and glossy and I'm pretty excited about what the final product is going to look like.

I haven't settled on the paint job for my tank and fenders. That's why I'm focusing on trim pieces where I have a better idea. This is either going to be a red bike with black trim or a black bike with red trim.


AIS is gone. New pegs is on!
Meanwhile, I've been cleaning up the front of the bike. I took the AIS system off - a common mod -- and then noticed the California emisssions can on the other side. Turns out, I don't have an California tank, so I took that off too. Now the front of my bike has a cleaner, more open look without all the nanny-state plastics. That said, I could not get the AIS plugs out of the engine, so I sealed them off. The back plug elbow  broke off while I was trying to use the slide hammer to yank it out. So I sealed that up with some steel reinforced epoxy. The front one is sealed with a little bolt. I'll paint them black -- maybe put a little copper plumping cap on -- give it that steam engine look.


The two hoses left behind by the removal of the AIS and the Cali Can are plugged with a golf tee and a rollover valve respectively, but I might remove the rollover valve and extend the hose.

I also put on the new front pegs, which are much better than the bent ones that were on there previously. I took the exhaust off and discovered a lot of rust and dents. I bought all new gaskets and I'm giving it a nice coat of ultra hi-temp Rustoleum gloss black. My goal is to get it looking like an old un-restored bike - no chrome, just a tough old donkey ready to go anywhere.

I still have a lot to do. Even if the paint progress is encouraging, there are still a lot of projects left before I get on and ride. I have a braided brake line and new brake pads for the front. I need to take the rear wheel off and lube the splines of the main drive shaft. While I have the wheels off, I want to paint -- or plastidip -- them.


Ready to paint - I'm using a total of three
different kinds of primer on this project. 


Fenders are almost ready for paint.
Another coat of primer and some sanding first. 
Good bye rusty pipes. 


This is my blank canvas.